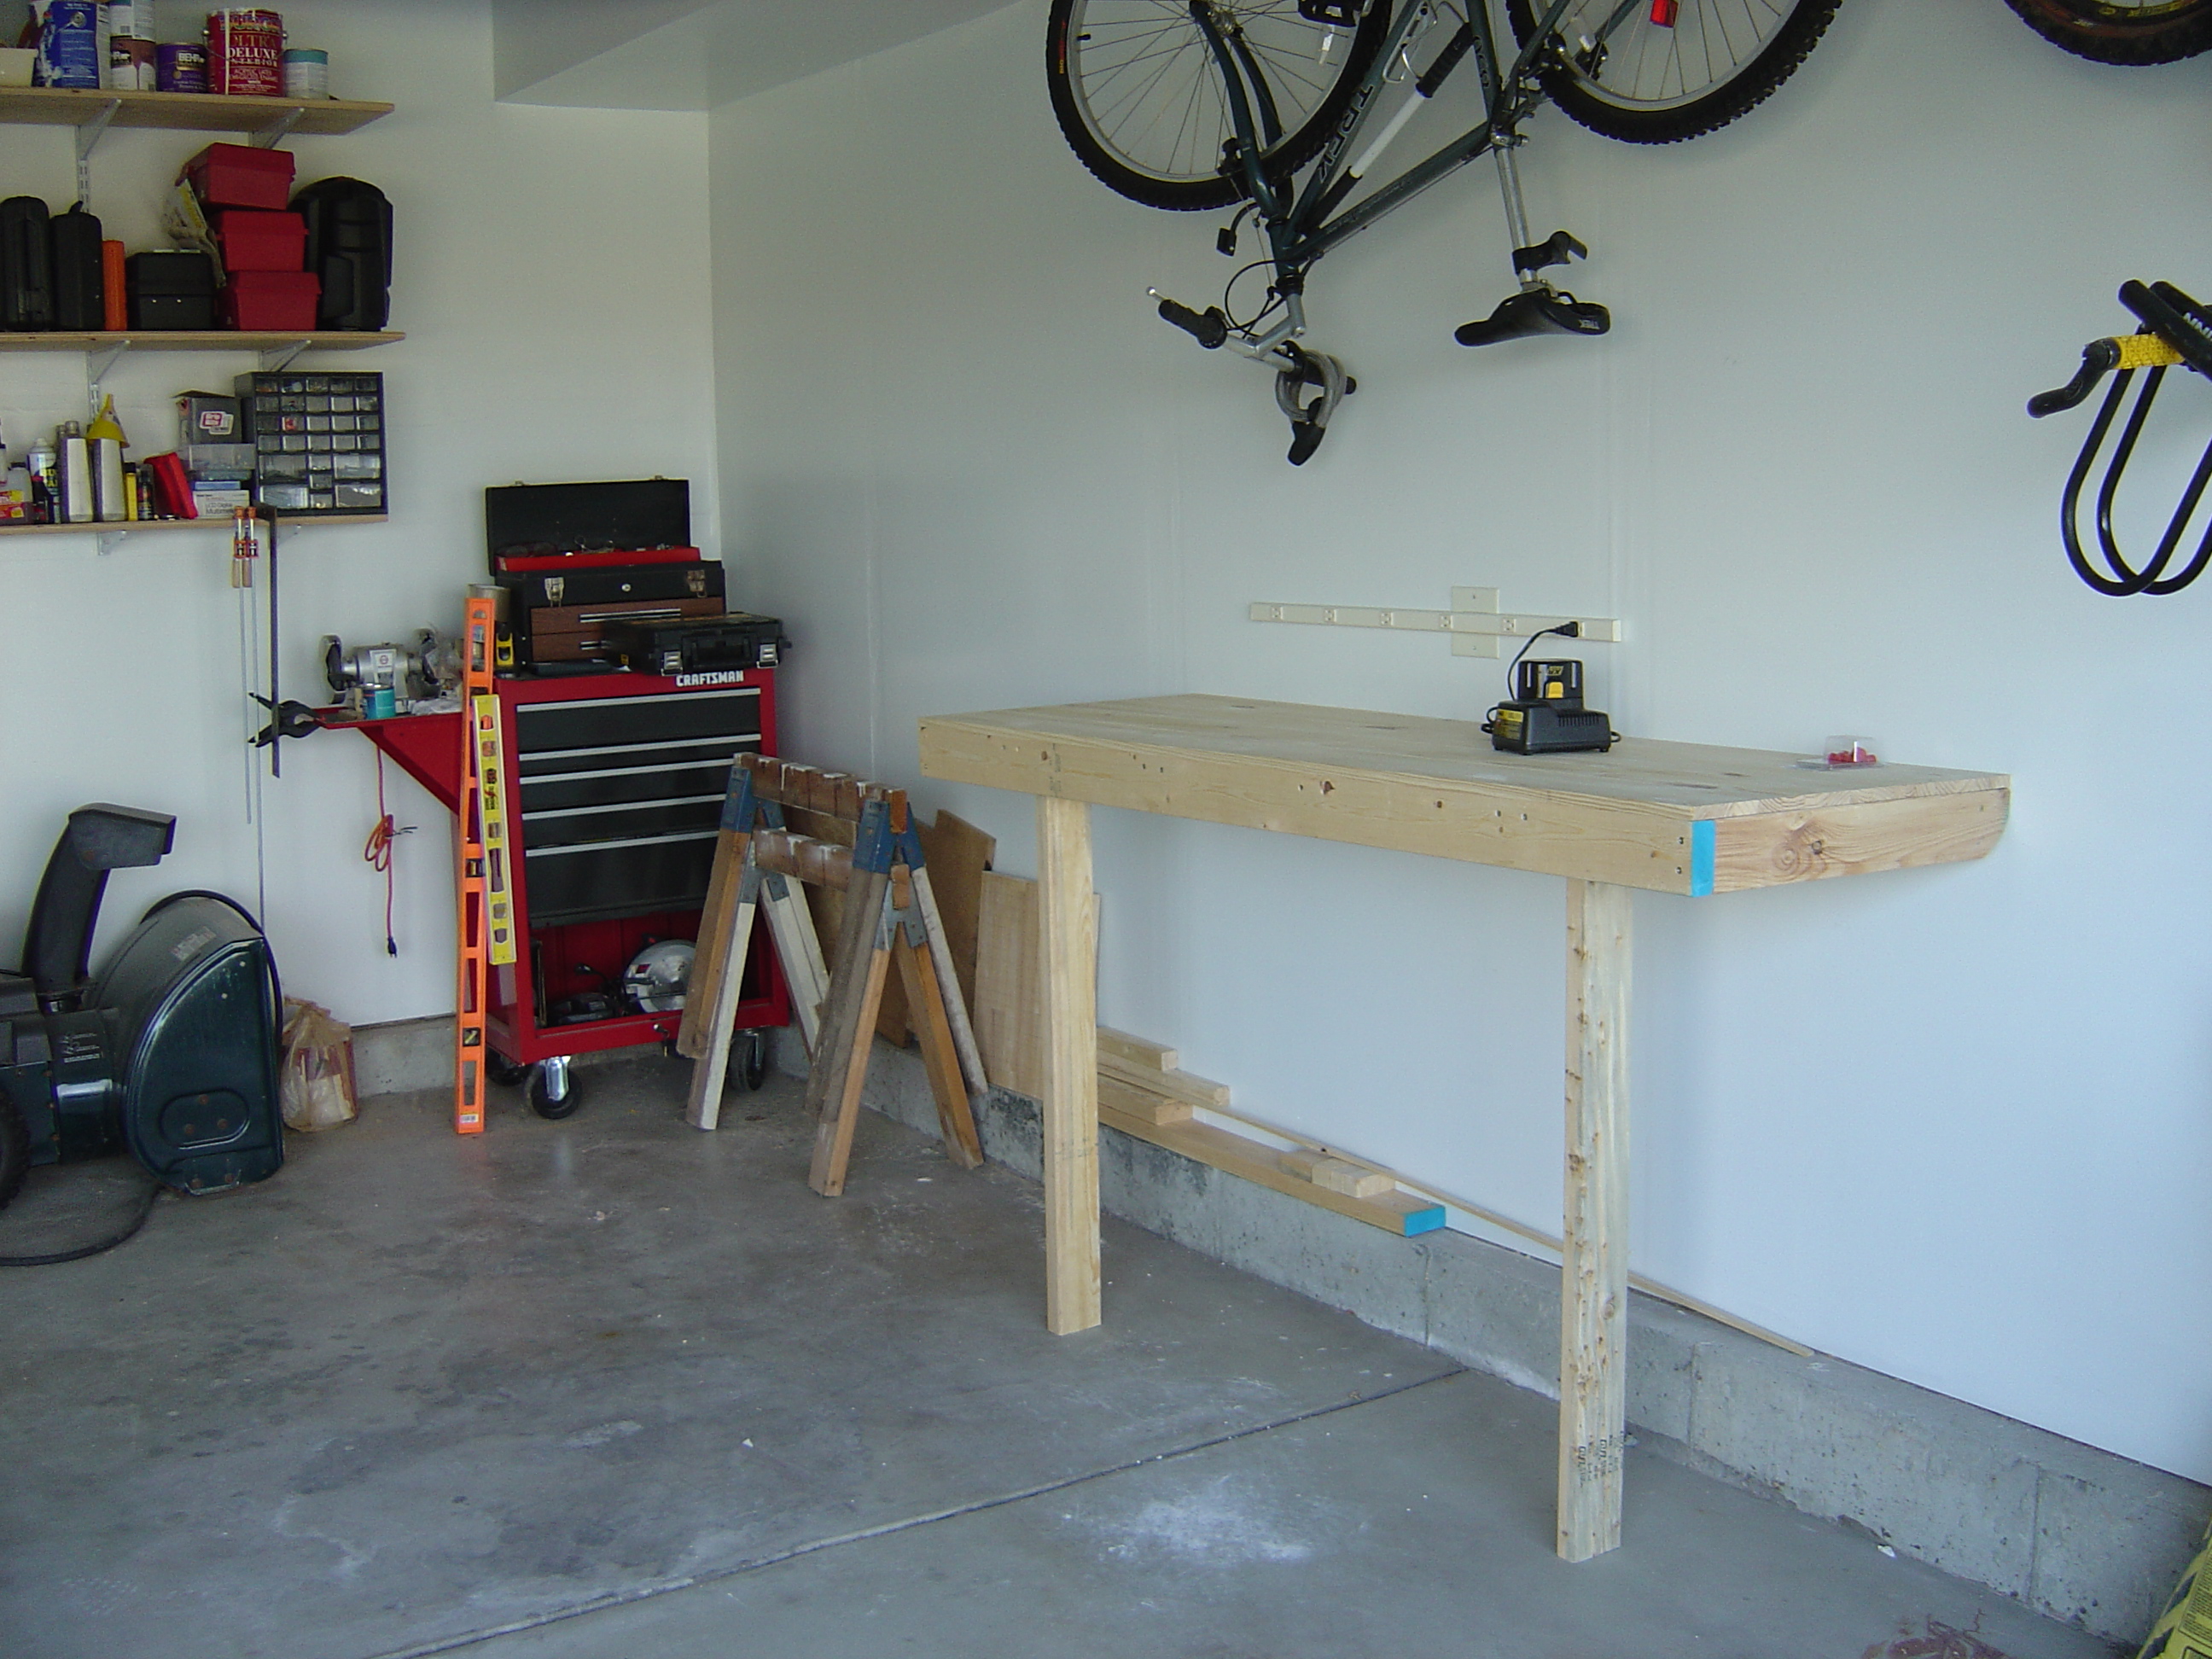
Compact Garage Workbench
A simple and solid workbench for the suburban garage that has little room
to spare.
Legs fold up, and bench folds flush against the wall.


|
Material List
Dimensions are in inches, color should match diagram
(Assuming 2x4 == 1.5in x 3.5in and 2x2 == 1.5in x 1.5in)
[#] 2x2 69 long
[#] 2x4 19.5 minus hinge thickness
[#] 2x4 19.5 minus hinge thickness
[#] 2x4 19.5 minus hinge thickness
[#] 2x4 22.5 long
[#] 2x4 22.5 long
[#] 2x4 40 long + more if floor is not flat
[#] 2x4 40 long + more if floor is not flat
[#] 2x4 69 long
[#] 2x4 72 long
[#] 3/4 x 24 x 72 pine sheet
[#] 6 standard gold door hinges @ 3.5 x 1.5 when folded
[#] 36 Lag Bolts @ 1 long (used on hinges)
[#] 25 #2 wood screws @ 1.5 long (used on table top)
[#] 18 #2 wood screws @ 2.5 long (used on Frame)
[#] 10 #3 wood screws @ 3.5 long (used on Wall Piece)
NOTE: found the pine sheet pre cut and ready to go at the Home
Depot.
|
Views
Top

|
Front

|
Right

|
Perspective

|
Back Views
Bottom

|
Back

|
Left

|
Perspective-under

|
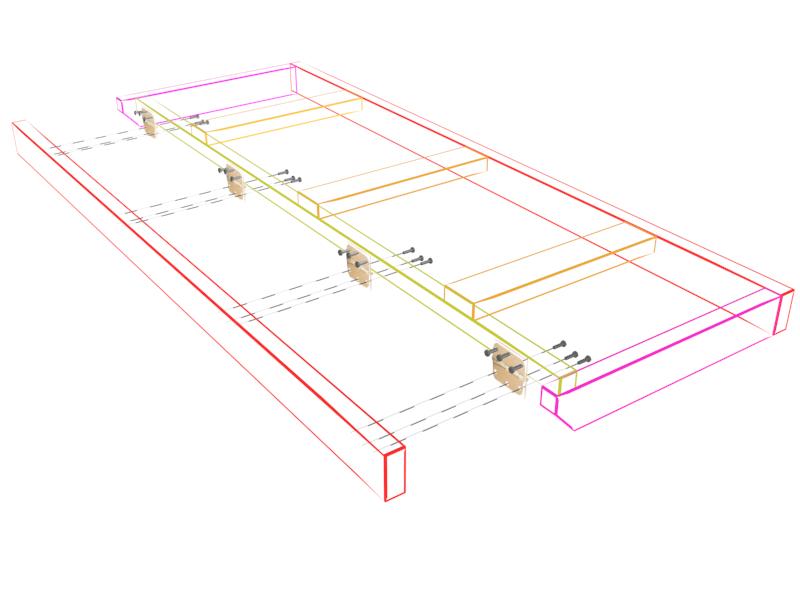
Exploded Views
Wood Assembly

|
Hinge Assembly

|
Carpentry Tips
- Understand how the final product will operate, and how it will be
assembled before begining construction
- Do a test fit before attaching pieces .
- Glue is optional. It is not needed, but will make everything stronger.
- Pre drill all holes to avoid splitting.
- Counter sink table top holes to ensure a smooth work surface.
- When level matters, drive screws at opposite ends first, test for levelness, adjust
screws if needed, then drive interior screws.
Build Steps
1.) Build the Frame
a.) Build the Frame using the measurements found in the material list.
b.) Cut a 45deg angle taper at the end of each side piece as shown.
o Begin the cut 1.5in down from where the table top would be.
o This allows clearance for the table to fold
down.
c.) Use #2 woodscrews (or drywall screws) 2.5in or longer. Predrill each
hole.
d.) Use 2 screws for each 2x4, and 1 screw for each 2x2.
IMPORTANT: inset rear 2x2 NO MORE than the thickness of one
2x4 (about 1.5in) plus the thickness of
one hinge.

2.) Attach Wall Piece to the studs behind the wall
Here we attach the Wall Piece, it will serve as a strong anchor
point to attach the fold-down hinges of the workbench.
a.) Measure 40in from the highest point on the garage floor where you want
the workbench to begin, mark the wall.
b.) Using a level draw a line out from the mark about 72in. this represents
the top of the Wall Piece.
c.) Holding up the Wall Piece under the marked line, drive 2 3.5in Phillips
#3 wood screws through the Wall Piece and into each stud.
Make sure the Wall Piece remains level while driving the screws.
NOTE: Most studs are spaced 16 inches apart behind the wall,
however, use a stud finder tool to ensure accuracy

3.) Attach Frame To Wall Piece using 4 hinges.
Follow steps in order, this one is easy to get wrong.
IMPORTANT: Do a test fit before drilling any hole. Pre drill before using lag bolts
a.) Prop the Frame flush against the wall (in the folded down position), and so that the tapered ends
come up flush with the top of the Wall Piece. Mark where the hinges will go
on the 2x2. 12 markings will be done.
b.) attach the 4 hinges to the 2x2. 12 lag bolts are needed for this.
c.) holding the Frame against the WallPiece (in the open position), mark where the 2x2 bolt
heads touch the WallPiece (12 markings). Also mark where the hinges will attach to the
Wall Piece. (12 more markings)
d.) using a hole drill, drill holes into each of the 12 bolt markings made in step
c. These only need to be as deep as a bolt head and will allow the 2x2
bolts to recede into the Wall Piece when table top is fully opened.
e.) attach the 4 hinges to the WallPiece (12 bolts). Ensure that the table top will
orient into both the folded and the open positions.
Step a and b (folded down position)

|
Step c-e (open position)
|
4.) Attach the legs.
One leg is attached farther back than the other one to
allow them to fold up flush into the Frame body (see Finished section
at end).
a.) Cut legs to fit. Have a friend hold the Frame in the open
position leveled both ways horizontally.
b.) Measure down from each leg position under the Frame. This value
is likely different for each leg depending on your garage floor
slope.
c.) Cut legs, and use them to prop the table (give your friend a
break!)
IMPORTANT: Check surface for
levelness. Repeat this step until surface is level.
d.) On one leg, while it is propping the table and it is flush against the front of the Table, level
the leg, and mark holes for the hinge. Drill the holes, and drive in
bolts to attach the hinge. Test that the leg folds flush into the body.
e.) On the second leg, fold up both legs side by side and then mark
where the second leg will go. Prop the Table up with the second leg,
and attach the hinge using same method in step d.).
See Also: The "Finished" section
at end of this document for how the legs fold up. They should both
be hidden and flush inside the Table when folded down for storage. They will
also not be attached at the same depth on the Table.

5.) Attach the Top piece
Fit the wood sheet onto the top of the Frame, flush with sides.
Use #2 wood screws (1.25in or longer) to attach to frame, a 5x5 grid of screws driven into the
cross supports should be plenty.
IMPORTANT: Ensure no screw enters the Wall Piece.
TIP: Pre drill and counter sink all holes to ensure a smooth work
surface. You wouldn't want to clamp your exotic wood project onto a
protruding phillips screwhead...

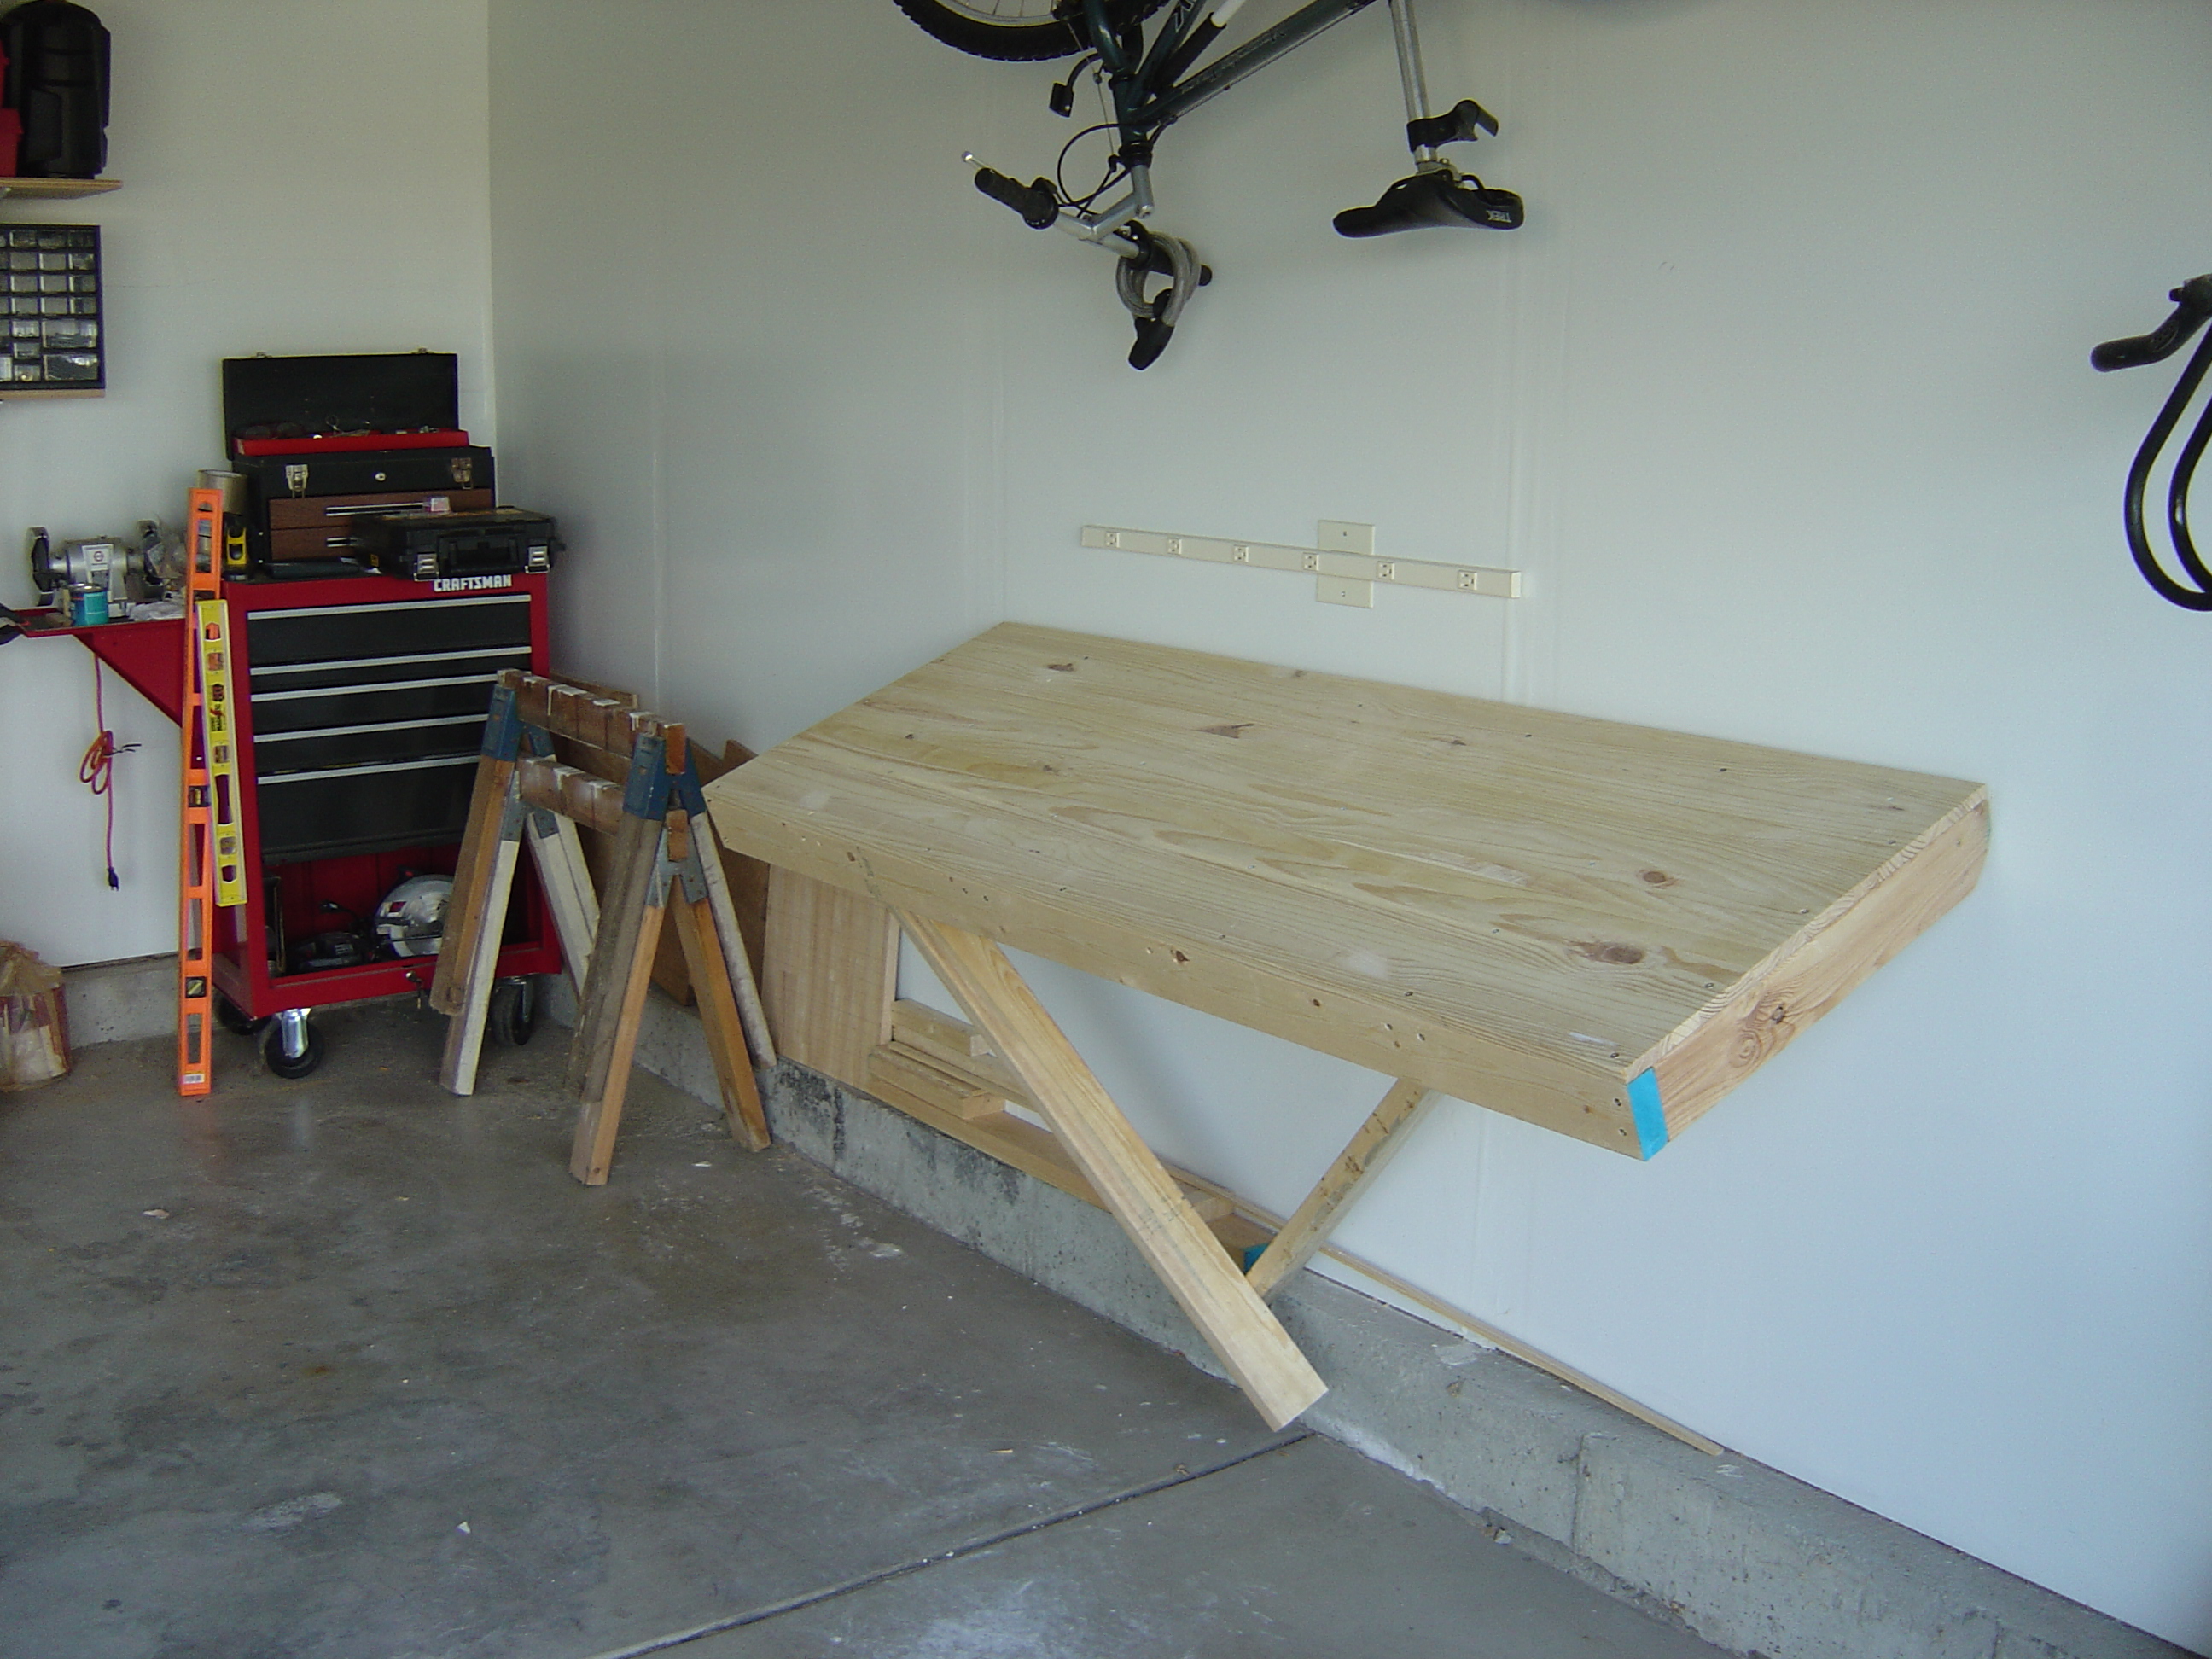
Finished
Finished Table

|
Fold up the legs:

|
With the legs completely folded under, Fold the table down flush against
the wall:

|
Close up of the rear hinge attachments:

|